
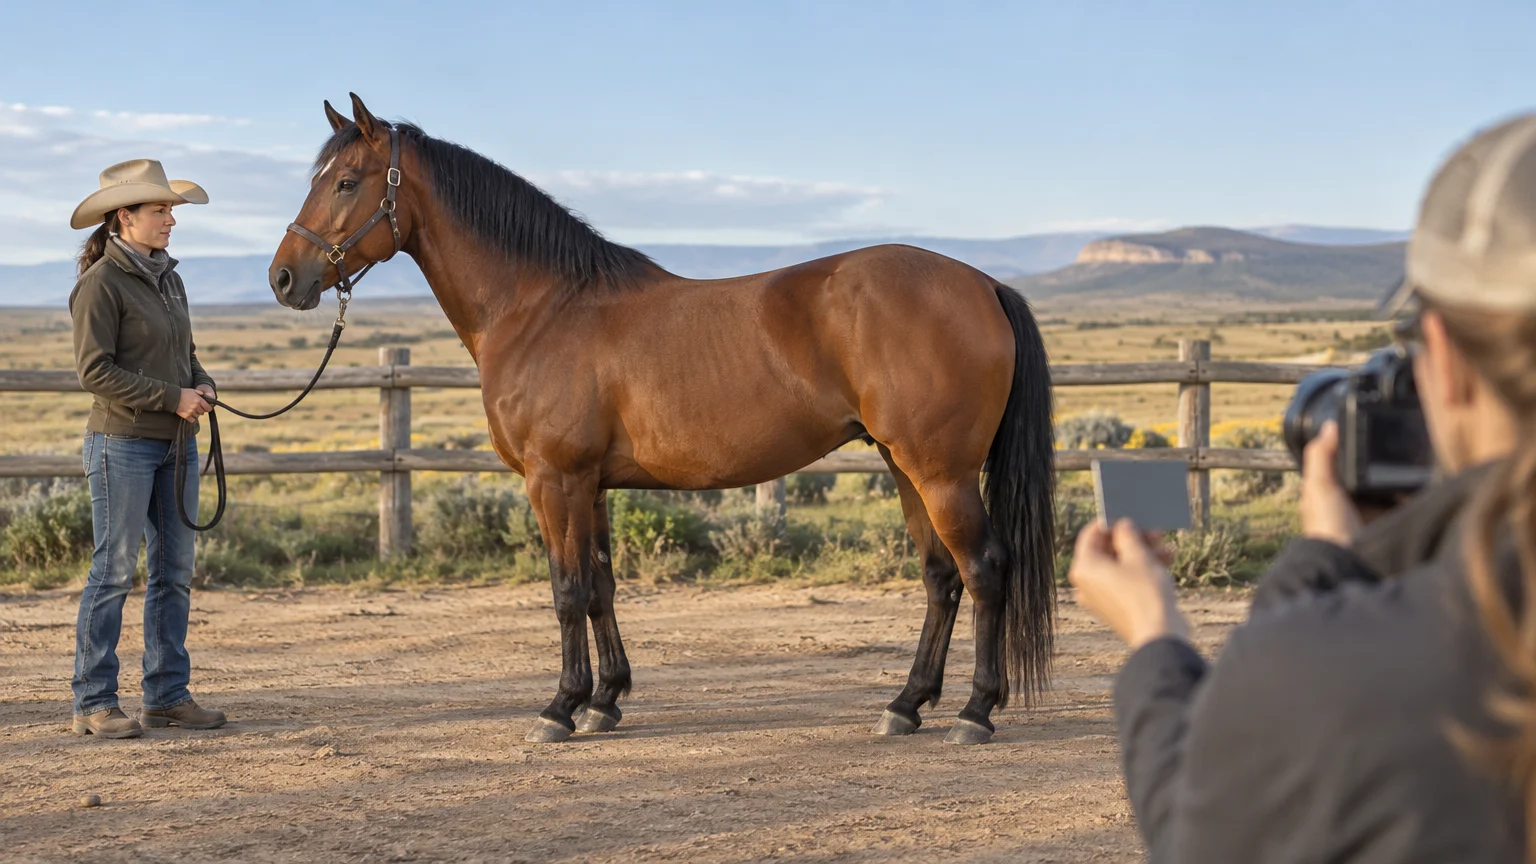
Useful horse identification photos are systematic rather than artistic. Start with unobstructed views from the left, right, front, and rear. Then photograph the face, legs, whorls, scars, brands, tattoos, freeze marks, and any other feature that could distinguish the horse. Record the date, connect the images to a written description, preserve the original files, and repeat the set regularly.
The goal is not simply to prove that you have photographs of the horse. It is to create a record from which another person can recognize the same individual months or years later. That calls for consistent angles, enough context to locate small marks, and file organization that will survive a change of phone or computer.
Prepare the horse and setting
Choose a safe, level area with uncluttered surroundings and good natural light. A plain wall, open barn aisle, or quiet section of paddock can work if the horse stands out against the background. Avoid deep shade, harsh backlighting, patterned fencing, tall grass that hides the feet, and mud that covers leg markings.
Remove blankets, sheets, boots, wraps, saddles, and other equipment that conceals the body or legs. A simple halter and lead are usually practical, but position the handler so the person and rope do not cover the horse. Full-body views are most useful when the horse fills the frame without having its ears, nose, feet, or tail cropped out. Four clear sides without obscuring tack or people form the foundation of the packet.
Do not trade safety for a perfectly square photograph. Use a competent handler, keep the horse in a familiar setting when possible, and allow enough time for the horse to settle. For the rear view, maintain a safe working position rather than standing directly within kicking range.
Photograph these views in a repeatable order
| View | What the image should show | Details to check |
|---|---|---|
| Left profile | The entire horse from nose to tail and ears to hooves | Coat pattern, body scars, leg markings, mane, brands, tattoos, or a neck freeze mark |
| Right profile | The entire opposite side at approximately the same distance | Features hidden in the left profile and differences between paired leg markings |
| Front | Face, chest, knees, forelegs, and both front feet | Blaze or star shape, muzzle markings, eye differences, foreleg white and limb alignment |
| Rear | Hindquarters, tail, hocks, hind legs, and feet | Hind-leg markings, scars, coat patches, and tail characteristics |
| Head and face | A straight frontal view plus useful side views | Whorls, facial white, eye color, scars, unusual hair patterns, and muzzle pigmentation |
| Each leg | The complete leg plus closer detail where needed | Highest edge of white, spots within white, scars, chestnuts, and permanent marks |
| Distinctive features | A locating view and close detail of each feature | Whorls, scars, blemishes, brands, tattoos, freeze marks, or unusual pigmentation |
Try to keep the camera approximately perpendicular to each side rather than photographing from far in front or behind. Ask the handler to hold the head in a natural position. A dramatically turned neck may make a horse look elegant, but it can hide a brand, whorl, throat marking, or the true outline of facial white.
Take more than one frame at every angle. A swishing tail, cocked hind leg, blink, or gust of mane can hide a useful detail. Review the images before releasing the horse, enlarging each one long enough to check focus and confirm that all four feet remain visible.
Match the photographs to a written signalment
A signalment is a written description of the horse. The photographs and description should agree on coat color, facial and leg markings, eye color, hair whorls, scars, blemishes, brands, tattoos, and freeze marks. The APHIS equine identification guide identifies these as useful equine identification features and notes that neck whorls can be particularly valuable when a horse has little white and no tattoo or brand.
For leg white, describe the highest point using anatomy and location instead of relying only on terms such as sock or stocking. Those informal terms are not applied consistently by every registry. If existing registration, adoption, passport, or veterinary records use a particular color or marking term, preserve that wording in your file while allowing the photographs to show the feature itself.
Owners documenting a Sulphur horse may also want clear views of a dorsal stripe, leg barring, facial masking or cobwebbing, and a bicolored mane or tail. Such characteristics can add valuable historical context, but a herd-associated trait is not unique proof of an individual horse’s identity. For a broader record that connects photographs with paperwork and permanent identifiers, see how to build a strong horse identification record.
Give small marks both context and scale
A close-up of a scar is not very useful if nobody can tell where it sits on the horse. Use a three-image sequence for every small or easily confused feature:
- Take an overview showing the horse and the general location of the feature.
- Take a body-region image, such as the entire shoulder, neck, or lower leg.
- Take a sharp close-up that records the feature’s shape, edges, color, and surrounding hair.
When size matters, make one close image without a scale and another with a ruler or other clearly measured reference. Keep the scale in the same plane as the mark to reduce perspective distortion. Never tape an object to the horse or introduce a measuring tool in a way that could frighten the animal.
Use a real measurement when practical rather than a coin, hand, or other object whose dimensions may be unclear. Record the measurement in the written notes as well. For a changing injury or temporary blemish, label the photograph accordingly so it is not later mistaken for a permanent identifying mark.
Record brands, freeze marks, tattoos, and microchip information carefully
Permanent identifiers deserve an overview and a readable close-up. Photograph the relevant body region even when the mark is faint. Adjust your position and lighting rather than heavily editing the image, and retain the unedited original alongside any contrast-adjusted working copy.
For a BLM-adopted horse, include a clear image of the left side of the neck where the BLM freeze mark is located. The Bureau of Land Management’s freeze-mark information explains that removed wild horses and burros receive a freeze mark and microchip, and that freeze-mark information can be used to retrieve associated records through the agency’s dashboard.
A microchip cannot be documented visually in the same way. Keep the verified chip number, scanner date, registration details, and veterinary confirmation in the horse’s secure record. Avoid putting a complete microchip number in a publicly shared filename or social-media caption.
Photographs support identification; they do not replace registration papers, adoption documents, bills of sale, microchip registration, brand records, veterinary records, or required movement documents. Interstate requirements can vary, so check with the animal-health officials in the destination state before travel.
Use dates and filenames that remain understandable
Do not rely solely on the date displayed in a phone gallery. Image metadata may be changed or removed during editing, export, or sharing. Put the capture date in the filename and repeat it in the horse’s record log.
A practical naming pattern is YYYY-MM-DD_HorseName_InternalID_ViewOrFeature_Sequence. For example: 2026-05-14_Sage_SHR042_LeftProfile_01.jpg. The year-month-day order sorts chronologically, while the internal ID helps distinguish horses with similar barn names. This is an owner filing convention, not a registry standard.
Useful view labels include LeftProfile, RightProfile, Front, Rear, Face, LeftFore, RightHind, NeckWhorl, ShoulderScar, Brand, and FreezeMark. Keep the terms consistent from one session to the next. Use sequence numbers when taking several images of the same feature rather than overwriting earlier files.
Consider privacy before placing owner names, home addresses, complete microchip numbers, or other sensitive information in filenames. A secure internal ID can connect the images to a private master record without exposing that information whenever a picture is emailed.
Preserve originals and organize working copies
Create one folder for each horse, with dated subfolders for individual sessions. Keep the original files as masters and make separate copies for cropping, annotation, contrast changes, or submission to a registry. The Library of Congress guidance on personal digital archiving recommends retaining master versions, creating working copies for edits, and storing backups in separate places.
A straightforward folder might contain Identification Photos, Registration and Adoption, Ownership, Veterinary, Pedigree, and Historical Material. Keep a short index listing the horse’s registered name, barn name, internal ID, photograph dates, permanent identifiers, and the location of original paperwork. Documentation is especially important in small heritage populations because identity, ancestry, ownership, and status must remain connected over time; better documentation supports that continuity.
Repeat the photographs before the old set becomes misleading
Take a baseline set at purchase, adoption, registration, or arrival. Update it at least annually and after an event that materially changes the horse’s appearance, such as a new scar, acquired brand, major injury, or substantial color change. Young horses and greys may need more frequent photographs because foals can change toward adult color and grey horses accumulate white hair over time. Seasonal coats can also alter how markings and scars appear.
An annual four-view update is a useful minimum for mature horses, and taking occasional summer and winter views can preserve differences caused by coat length. Minnesota Extension recommends keeping ownership records and four-side photographs current. Do not delete previous sets when adding new ones; the sequence itself documents change.
A field checklist for the next photo session
- Confirm the horse’s name, internal ID, and existing record terminology before starting.
- Choose a level, uncluttered location with even light and a contrasting background.
- Remove equipment that hides the body or legs.
- Take left, right, front, and rear full-body views.
- Photograph the face, both sides of the head, each leg, and all distinctive features.
- Give every small mark an overview, regional view, and close-up.
- Include measured scale images where size matters and it is safe to do so.
- Check focus, framing, and visible feet before ending the session.
- Save original files, create dated filenames, and make separate working copies.
- Update the written signalment and note any change from the previous session.
- Back up the folder in a separate location and retain all older photo sets.
Make one complete baseline set now
The most valuable next step is simple: schedule a quiet 20-minute session and complete the four full-body views plus the horse’s distinctive details. Name and back up the files the same day, then place a reminder on the calendar for the next annual update. A careful record made while the horse is standing safely at home is far easier to use than a collection of attractive but unidentified pictures gathered after the fact.
References
- Identification Using Signalments in Horses | Extension Horses
- NVAP Reference Guide: Equine Identification | APHIS
- Safeguarding your horse farm | UMN Extension
- CRIME SCENE PROCEDURES II.
- Personal Digital Archiving: The Basics of Scanning | The Signal
- Page 8 Friday, November 21, 2003 The Observer/Enterprise
- Assessing the Health and Well-being of Horses | Extension Horses
- 15 Steps to Minimizing Theft of Horses and Equipment | Extension Horses
- Utah – Sulphur HMA | Bureau of Land Management
- Freeze Marks | Bureau of Land Management